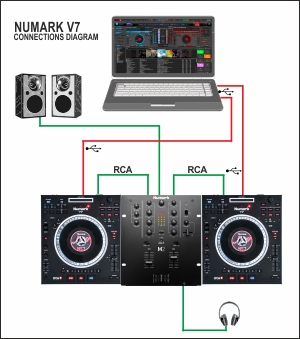
- Connect each V7 with a USB port of your computer using the provided USB cable.
- Use a pair of RCA cables to connect each V7 Output to an Input Channel of a mixer. Any analogue or digital mixer can be used.
- Connect your amplifier or amplified speakers to the Master Output of a mixer
- Power on each V7, your mixer and your amplifier.
NUMARK V7

SETUP
STEP 1. Connections
STEP 2. Firmware & Drivers
For both Windows and Mac OSX :
Install the necessary drivers, depending on your Operating System from https://www.numark.com/product/v7
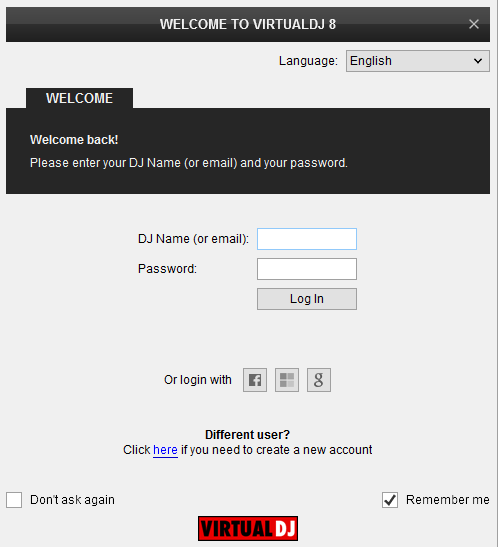
STEP 3. VirtualDJ 8 Setup
Once VirtualDJ 8 is opened, a Login Window will appear. Login with your virtualdj.com account.
A Pro Infinity or a Pro Subscription License is required to use the Numark V7 with VirtualDJ 8. Without any of the above Licenses, the controller will operate for 10 minutes each time you restart VirtualDJ 8.
http://www.virtualdj.com/buy/index.html
Click on the Use Soundcard button and VirtualDJ will automatically apply the necessary Audio configuration.
Click OK.
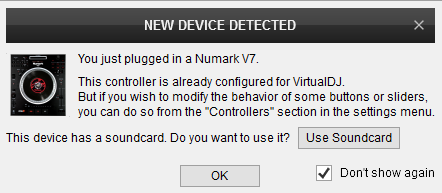
The unit is now ready to operate.
MIDI Operation
The unit should be visible in the CONTROLLERS tab of Config and the “factory default” available/selected from the Mappings drop-down list.
The factory default Mapping offers the functions described in this Manual, however those can be adjusted to your needs via VDJ Script actions.
Note. Each V7 unit (if more than 1 is connected) will be additionally displayed in this window, and any modifications in the mapping file will affect all units.
Find more details at http://www.virtualdj.com/wiki/VDJ8script.html
AUDIO Setup
The unit has a pre-defined Audio configuration for External mixer setup (as per the connections diagram above) and a special button in the AUDIO tab of Config to provide that.
For alternative Audio configurations please refer to Audio Settings of VirtualDJ 8 http://www.virtualdj.com/manuals/virtualdj8/settings/audiosetup.html
For further VirtualDJ settings and features please refer to the User Guide of VirtualDJ 8.
http://www.virtualdj.com/manuals/virtualdj8/index.html
CONTROLS
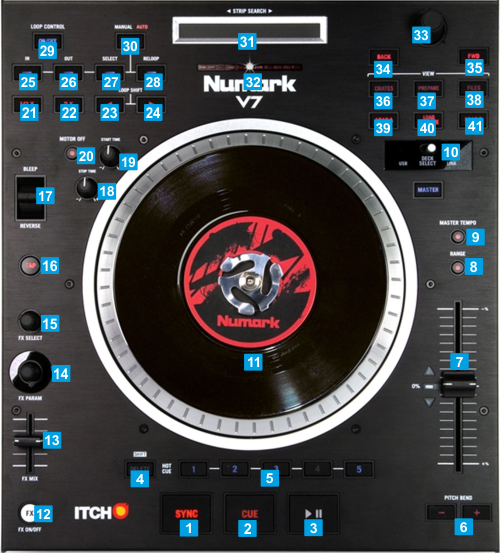
KEY
ACTION
When in Delete mode, delete the assigned Hotcue
Push to (un-)dock the FX GUI of the selected Effect in Browser
While in BLEEP position, track will play n reverse and once released, track will resume playing from the position it would havebeen if the reverse mode was never enabled (censor)
In Auto-Loop mode : Triggers a Loop of 1 beat in size
In Auto-Loop mode : Triggers a Loop of 2 beats in size
In Auto-Loop mode : Triggers a Loop of 4 beats in size
In Auto-Loop mode : Triggers a Loop of 8 beats in size
When focus is on the Folders list, push to set focus to Songs list if Folder has tracks, or expand and seect next sub-folder if folder has no tracks.
When in Songs List or Sideview, push to load the selected track to theDeck
